


Weekend Project: Building a Birdhouse
If you’re looking for a manageable weekend project, building a birdhouse is a great option. Not only is this project great for kids, but a birdhouse (or bat house—trust us!) is a great addition to your backyard for bird watching and helping our ecosystem. We’ll walk you through the benefits of adding a birdhouse or bat house and show you how to build a birdhouse from only one board.
Why Have a Birdhouse?
Whether you’re interested in all kinds of birds like cardinals and bluejays or have a special interest in endangered species such as the golden-cheeked warbler, a birdhouse is great for both birds and humans alike. Birdhouses provide:
- A home. Birdhouses are safe nesting places away from the elements and predators.
- Pest control. Some bird species eat insects helping to control those populations in your garden.
- An educational opportunity. Bird watching is a great hobby for all ages.
Attracting Birds
Depending on the type of birds you have, when to put out a birdhouse will depend on the nesting seasons. However, supplying a birdhouse in late winter or early spring is a good time for most birds to establish their nests.
Birdhouses should be placed in a safe area away from harsh elements and away from any predators like cats. Birds also prefer it to be firmly mounted to a tree or on the end of a pole instead of it swinging freely.
8 Tips to Make a Great Birdhouse
- Opening Sizes. It’s best to know the size of birds in your area. This will help to determine the best opening sizes to attract the right bird and not a predator. Your local or state Audubon society will have dimensions appropriate for the birds in your area.
- Untreated wood. Lumber used for the birdhouse should be untreated, as treated wood is harmful if ingested.
- Sloped roof. No bird wants a soggy home and adding a sloped roof will encourage water runoff keeping nestlings and mama dry.
- Drainage holes. If you live in a damp climate, adding small drainage holes to the bottom of the birdhouse will help keep the wood dry and further prevent rot. You can also have a recessed bottom to keep it even drier and include a way to open the door for cleaning.
- 3/4" Thick walls. Thickness matters in a birdhouse like insulation matters in your own house. 3/4” walls help to provide insulation.
- No perches. Perches are a great spot for predatory birds to sit and wait for nestlings. No perches keep the inhabitants safe.
- Rough interior walls. Roughing up the interior walls with sandpaper adds some grip to the wood as the nestlings learn to climb and fly.
- Natural or bright colors. Earth tones might provide greater protection against predators as they provide some camouflage. However, if you’d like a bright color, some birds might be attracted to it.
How to Build a Birdhouse
There are many different designs of birdhouses, and you can even design your own using the tips above. For a simple weekend project, this birdhouse design only requires one board.
Birdhouse Materials
- 1x6x8 pine board or a spare cedar picket
- Miter saw
- Drill with bits including a hole saw
- Galvanized wood screws one to two inches
- 150-grit Sandpaper
- Hinges
- Clamps or painter's tape
- Pencil
Birdhouse Steps

- Cut your board using the cut sheet provided or design your own.
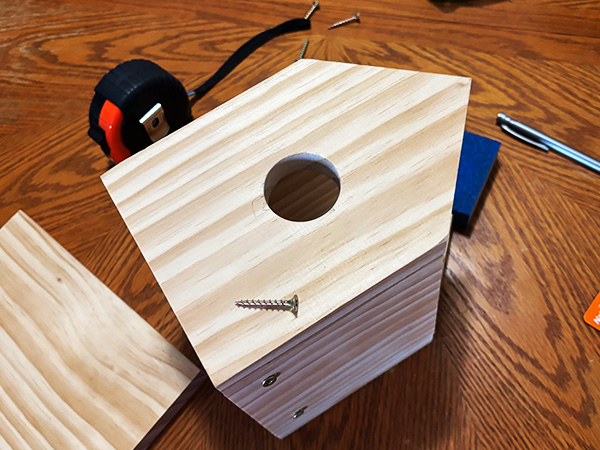
- Drill the hole opening. We used a 1 1/2” hole saw.
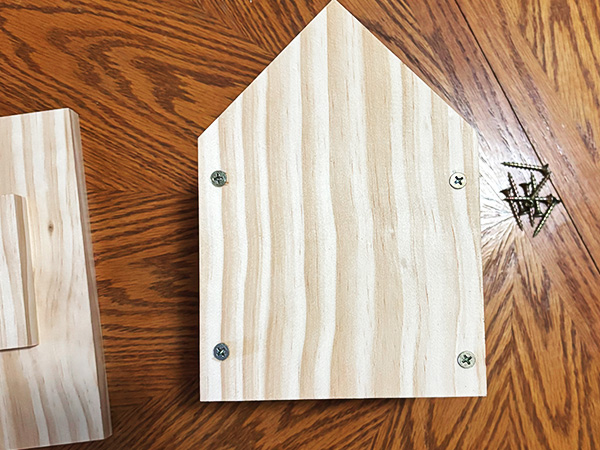
- Attach the sides and the back with screws. We used two per seam.
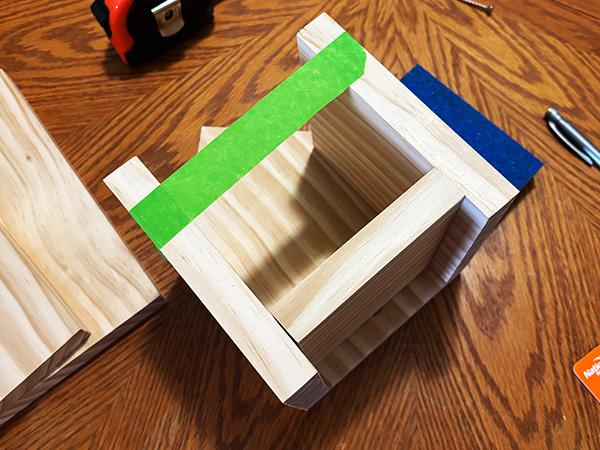
- Position the bottom and recess it up into the birdhouse about 3/4”. Here is where you can drill small holes into the corners of the bottom board for drainage and airflow.
- Attach the front using two screws per seam. Be sure to measure up 3/4” before screwing together the from and bottom.
- Attach the roof panels. The smaller roof panel should be attached with screws. The larger roof panel should be attached to the top seam of the roof with two hinges. Use painter’s tape to hold in place.
- Paint or stain as desired using outdoor paint or stain.
- Cut your board using the cut sheet provided or design your own.
- Drill the hole opening. We used a 1 1/2” hole saw.
- Attach the sides and the back with screws. We used two per seam.
- Position the bottom and recess it up into the birdhouse about 3/4”. Here is where you can drill small holes into the corners of the bottom board for drainage and airflow.
- Attach the front using two screws per seam. Be sure to measure up 3/4” before screwing together the front and bottom.
- Attach the roof panels. The smaller roof panel should be attached with screws. The larger roof panel should be attached to the top seam of the roof with two hinges. Use painter’s tape to hold in place.
- Paint or stain as desired using outdoor paint or stain.
Hanging Your Birdhouse
It’s best to hang the birdhouse in a quiet and shaded area. Trees are, of course, great locations. We recommend adding a backer board to the back of the birdhouse, attach with screws and screw into a tree. If you would like to hang your birdhouse, attach two eye screws, one on each roof panel, and hang with a sturdy string. If, you choose this option, screw down the roof panel with the hinge and unscrew it when cleaning is needed.
Bat Houses
You might be more hesitant about a bat house than a birdhouse, however bats provide similar benefits to birds in a backyard or garden. Bats keep your yards free of mosquitoes and other pesky insects. Habitat loss has also affected bat numbers and bat houses give them a safe place that is away from your attic.
Bat houses are chambered with small, narrow openings that mimic a tree or other natural tight spaces as that’s what bat prefer. They can either be made or bought.
What Makes a Great Bat House?
- Bat houses should be made from exterior grade plywood or cedar and not pressure treated lumber.
- Bat houses should be tall and wide by a minimum of 24”x14”. The chambers inside should be one to two inches apart.
- The bottom should be open to prevent the buildup of guano. Guano is not toxic and is high in nitrogen making it a great fertilizer.
- Bat houses should be mounted on the side of a house or other building near the eaves. Alternatively, the houses can be mounted on top of a large pole. They should be at least 12’ off the ground for the bats to drop into flight.
We Help Build Houses of All Sizes
It’s very tweet of you to build a birdhouse! Whether you are looking to enjoy some bird sightings or have a bat house for all the benefits they provide, we’ve got you covered. Shop online and pickup in-store today for all your materials for a great weekend project!